Wholesale Auto Parts in Miami
Wide Selection of Auto Parts for All Vehicle Makes and Models
Since 1961
What Is a Brake Fluid Flush?
Signs You Need a Brake Fluid Flush
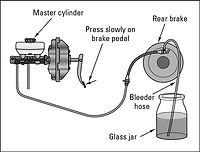
A brake fluid flush removes contaminated or moisture‑laden brake fluid from the entire braking system—master cylinder, lines, calipers—and replaces it with fresh fluid. Its goal? Restore optimal hydraulic pressure and braking performance.
Watch for these warning signals:
-
Spongy or soft brake pedal (due to moisture/air in lines)
-
ABS warning light triggered by low fluid or sensor issues
-
Inconsistent braking performance, longer stopping distances
-
Dark or burnt‑smelling fluid, strange sounds during braking
Benefits of Brake Fluid Flush
-
Improved brake performance & safety – Fresh fluid helps prevent brake fade and vapor lock by maintaining a higher boiling point
-
Corrosion prevention – Removes moisture that causes rust inside calipers, lines, and master cylinders
-
Extends brake system lifespan – Protects expensive components and prevents sludge buildup
How Often to Flush Brake Fluid
Recommended interval:
-
Every 2 years or 30,000–50,000 miles (or sooner in humid regions)
Step‑by‑Step DIY Flush
Alternatives to DIY
-
Pressure‑bleeder or vacuum‑bleeder kits offer single‑person convenience
-
Professional mechanic services— deeper cleaning, ABS circuit included, takes ~30–60 minutes
FAQs
-
Can I top off old fluid?
No—this only dilutes contaminants without removing them -
How much does it cost?
Typically $70–$150 at a shop; kit costs vary for DIY. -
Can I mix DOT fluid types?
Avoid mixing — match the spec (DOT 3, 4, 5.1) to prevent chemical incompatibility